Latest Version
January 04, 2025
EPSON
L Series
Windows
967
Free
Epson L1300 Adjustment Program
Report a Problem
More About Epson L1300 Adjustment Program ( Resetter )
Epson L1300 Adjustment Program (Resetter): Full Guide & Free Download
The Epson L1300 printer is a reliable A3 printer known for its superior print quality and affordable ink system. However, like any inkjet printer, it can face issues such as the “Service Required” or “Waste Ink Pad Full” error after prolonged use.
That’s where the Epson L1300 Adjustment Program, also called the Resetter Tool, becomes essential.
This comprehensive guide explains what the adjustment program does, how it works, and how you can use it safely to reset your printer and avoid unnecessary servicing costs.
What Is the Epson L1300 Adjustment Program?
The Epson L1300 Adjustment Program is a maintenance and troubleshooting utility developed to communicate directly with your printer’s firmware. It allows users to:
-
Reset the Waste Ink Pad Counter
-
Clear the “Service Required” message
-
Perform print head cleaning and alignment
-
Check and reset ink levels
Ink pads inside the printer collect excess ink during cleaning cycles. Once they reach their limit, the printer stops working to prevent ink overflow. The resetter software clears this internal counter, letting the printer function normally again.
Why Use the Epson L1300 Resetter?
Here are key benefits of using the adjustment program:
-
🧩 Fix “Waste Ink Pad Full” Error:
Instantly remove the “Service Required” alert without visiting a service center. -
💰 Save Time and Money:
Avoid costly technician repairs — perform basic resets at home in minutes. -
⚙️ DIY Maintenance:
With its user-friendly interface, anyone can perform printer maintenance tasks easily. -
🎯 Improve Print Quality:
Use the head cleaning and alignment options to ensure smooth, vibrant printing. -
🖨️ Extend Printer Lifespan:
Regular resets and maintenance keep your printer working efficiently for years.
How the Epson L1300 Adjustment Program Works
The program works by connecting your computer to the printer via USB and adjusting its internal maintenance counters. It accesses hidden settings within the printer firmware to reset usage data safely.
Key Functions:
-
Waste Ink Pad Counter Reset
-
Head Cleaning
-
Ink Level Reset
-
Print Head Alignment
-
System Diagnostics
How to Use the Epson L1300 Adjustment Program (Step-by-Step)
Step 1: Download the Program
Download the Epson L1300 Adjustment Program (Resetter Tool) from a trusted source. Ensure it’s compatible with your version of Windows (7, 8, 10, or 11).
Step 2: Install or Extract
Some versions are portable; others need installation. Unzip or install the file, depending on the version you downloaded.
Step 3: Connect Your Printer
Connect your Epson L1300 printer via USB and turn it on.
Step 4: Launch the Program
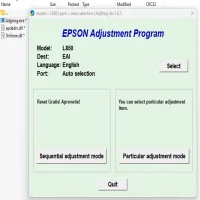
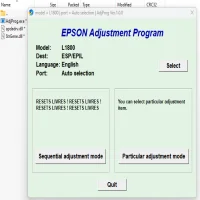
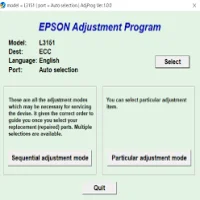
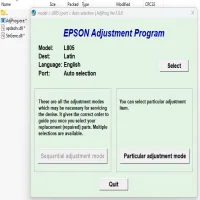
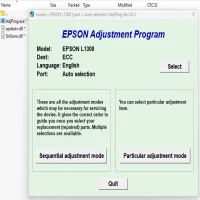
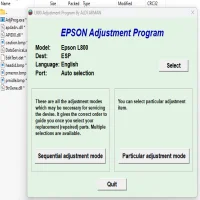
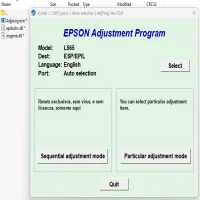
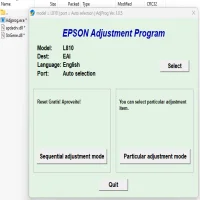
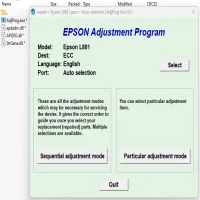
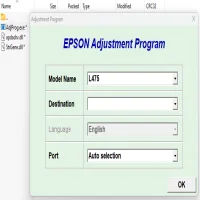
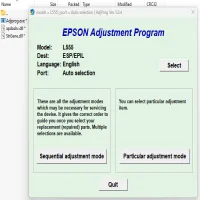
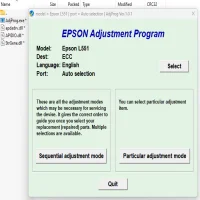
Open the Adjustment Program, select your printer model (L1300), and click on “Particular Adjustment Mode.”
Step 5: Reset the Waste Ink Pad Counter
-
Choose “Waste Ink Pad Counter”
-
Click Check → Initialization → Finish
The printer will automatically reset and restart.
Step 6: Test the Printer
After resetting, print a test page. If everything went well, the “Service Required” error should disappear.
Safety Tips & Warnings
⚠️ Use the Correct Version:
Only use the resetter made for the Epson L1300 model. Using an incorrect version may cause software damage.
⚠️ Clean the Ink Pad Physically:
Resetting only clears the counter — it doesn’t physically clean or replace the waste ink pad.
⚠️ Backup Before Use:
Save your printer settings before making changes.
⚠️ Warranty Note:
Using third-party software may void the printer’s official warranty.
Benefits of the Epson L1300 Adjustment Program
✅ Cost-effective maintenance
✅ Avoid downtime from “Service Required” errors
✅ Improved print performance
✅ Extended printer life
✅ User-friendly and fast
Frequently Asked Questions (FAQs)
Q1: Is the Epson L1300 Resetter free to use?
Yes, many versions are free. Just ensure you download from a trusted source.
Q2: Can I use this program on Windows 11?
Yes, the latest version works smoothly on Windows 10 and 11.
Q3: Do I need to replace the waste ink pad physically?
Eventually yes, because the reset only clears the counter, not the physical pad.
Q4: Is it safe to disable antivirus during installation?
Yes, temporarily disabling antivirus is safe since the tool is often flagged as a false positive.
Conclusion
The Epson L1300 Adjustment Program (Resetter) is a must-have utility for anyone using this printer. Whether you’re facing a waste ink pad full warning or service required message, this tool can help you restore functionality in minutes.
Always use it responsibly, follow the instructions carefully, and maintain your printer regularly for the best performance.
Rate the App
User Reviews

Popular Apps